Serial Terminal Software
If you ve lost the card or email that has your serial number and activation key, you can get it from any PC that has the same version of TinyTERM installed. In TinyTERM versions 4.60 and higher, simply go to the Help menu and select About. The serial number and license key are displayed there.
For versions 3.3 through 4.53, the license is stored in the registry. To view it, click on Start Run and enter:
regedit
In the Registry Editor, go to HKEY_LOCAL_MACHINE Software Century Software and click on the License1 key. The data string will include the serial number and activation key. The serial number will start with one of the following letter combinations:
WPL
PL
EV
TC
WS
There will be six or seven more digits, then the letters EM. That complete string is the serial number; e.g., PL12345678EM. If the serial number ends in EV instead, that s an evaluation license. Go to the License2 key instead in that case.
Immediately after the serial number will be eight lower-case letters. Those are the activation key.
If you click on the License1 key but don t see the serial number, you should see a series of two-digit hexadecimal numbers. That means you have TinyTERM version 4.33 or higher installed. To read that license, double-click the word Default in the key value. A dialog box named Edit Binary Value will come up. The right-hand column, which has lines of eight characters each, has the serial number and key. The serial number will start in the last two letters of the second line. It will start with either the letter P or the letter E.
If your version of TinyTERM is old enough that it does not write the license to the registry, search C: for a file named marathon.ini. The license will be written to that file also. If that file is missing, you won t be able to recover the license at all.
You can find a table of Century Software, Inc., products and their associated serial number formats on this page.
Home Support Knowledge Base
It s a pleasure using software that just works. Thanks Century.
The following tables summarize the various versions of TinyTERM and TERM, for both DOS and Windows platforms. They show which operating systems each version was originally supported on, the basic format of the serial number, and whether or not that version of TinyTERM is still eligible for telephone and email support. Support information for all versions is available in this Knowledge Base.
All versions prior to 3.3 shipped on diskettes.
Version
Year
Product
Serial Number
Currently Supported.
OSes
Pre 3.2 and 7.2
Up to 1995
TinyTERM
CSU777777TT
No
DOS
TERM for DOS
CSU777777IB
TERM for Windows
CSU777777IW
Windows 3.x
3.2
1995-1996
TinyTERM Plus DOS
DTP777777TT
TinyTERM Plus NFS DOS
DTN777777TT
WTE777777TT
Windows 3.1, 95 and NT 3.51
TinyTERM Plus
WTP777777TT
Plus NFS
WTN777777TT
Simply NFS
WSN107107US
7.2
WPE777777IW
TERM Professional
WPN777777IW
1995-1999
DPE777777IB
Version 3.3 combined the TinyTERM and TERM for Windows product lines, including ending the serial number in the letters EM. No serial number ends in the letters OEM. Any serial number in that format actually uses the number zero, not the letter O.
All products were released on CD from this point on.
Support for TinyTERM 3.3 and earlier Windows products ended in July 1999.
3.3
1997-1998
WTE777777EM
Windows 3.1, 95, NT 3.51 and NT 4.0
WTP777777EM
WPN777777EM
Version 4.x products are all named after TinyTERM.
Support for TinyTERM versions 4.00-4.21 ended in March 2007.
Support for TinyTERM versions 4.30-4.52 ended in May 2010.
4.00-4.01
1998
TinyTERM Web Edition
TWE777777EM
Windows 95, 98 and NT 4.0
4.02-4.05
1999
TinyTERM Plus Edition
WPL777777EM
TinyTERM Web Server Edition
WWS777777EM
TinyTERM Thin Client Edition
WTC777777EM
Windows NT 4.0 Terminal Server
4.10-4.11
2000
TTE777777EM
Windows 95, 98, Me, NT 4.0 and 2000
Windows NT 4.0 Terminal Server and 2000 Server
4.12-4.13
2000-2001
EV1777777EM
PL1777777EM
WS1777777EM
TC1777777EM
4.20-4.21
2001-2002
EV2777777EM
Windows 95, 98, Me, NT 4.0, 2000 and XP
PL2777777EM
WS2777777EM
TC2777777EM
Windows NT 4.0 Terminal Server, and 2000 Server
4.30-4.33
2002-2004
EV3777777EM
Windows 98se, Me, NT 4.0, 2000 and XP
PL3777777EM
TinyTERM Web Server
WS3777777EM
Windows 98se, Me, NT 4.0, 2000, XP and 2003
TinyTERM Thin Client
TC3777777EM
Windows NT 4.0 Terminal Server, 2000 Server and 2003 Advanced Server
TinyTERM Thin Client was made an install option of TinyTERM Plus in version 4.40.
Support for TinyTERM versions 4.40-4.52 ended in May 2010.
Curently Supported.
4.40
2004
EV4777777EM
PL4777777EM
WS4777777EM
4.41
E41777777EM
P41777777EM
S41777777EM
4.42
2004-2005
E42777777EM
P42777777EM
S42777777EM
4.43
2005
E43777777EM
P43777777EM
S43777777EM
4.50
2005-2006
E50777777EM
P50777777EM
S50777777EM
4.52
2006-2007
E52777777EM
P52777777EM
S52777777EM
4.53
2007-2009
E53777777EM
Windows 98se, Me, NT 4.0, 2000, XP and Vista
P53777777EM
Windows 98se, Me, NT 4.0, 2000, XP, 2003 and Vista
S53777777EM
Beginning with version 4.60, all products share the same 25-character activation key format.
TinyTERM Web Server was removed from the TinyTERM product line in version 4.60. Support for TinyTERM Web Server in all versions was also ended at that point.
Support for TinyTERM versions 4.60-4.64 ended in February 2013. Support for version 4.65 ended in August 2013.
Activation Key
4.60-4.64
2009-2011
TinyTERM SHA
ADHSX-FH2C7-VVFF7-CHLRA-5EZRP
Windows XP, Vista and Windows 7
4.65
2011
With TinyTERM 4.7.0, the version numbering scheme was changed.
TinyTERM AX for Web was added as version 4.7.6.
4.7.0-4.7.4
2011-2013
TinyTERM AX for Web
Yes
4.8.0-4.8.6
2013-2015
Windows XP, Vista, Windows 7, Windows 8
4.9.0 and newer
2015-
Windows XP and newer
You must be logged in to post a comment.
Access all of your serial-based equipment from any location through a single, highly secure gateway.

May 29, 2008 This hack shows how to make a dumb terminal out of a keyboard, LCD screen, and an 8-bit microcontroller. From time to time, a portable dumb terminal can.

Back to page
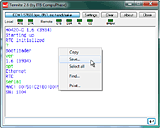
Screen-shot of the Termite utility
Termite is an easy to use and easy to configure RS232 terminal. It uses an
interface similar to that of messenger or chat programs, with a large window
that contains all received data and an edit line for typing in strings to transmit.
Highlights of the utility are the ease of installation possibly with pre-configured
settings using a heuristic search for the appropriate COM port and, as was mentioned,
its user-friendliness.
Other features are:
Plug-in interface for pre-processing or alternative
views of the data, logging received data to a file, adding a toolbar to Termite,
keyboard macros, and other functionality that you may think of.
A history of commands that you typed, with
auto-completion.
Resizeable main window, with a keep window on top option, multilingual user interface.
Ability to run with pre-configured settings from
a read-only medium no installation is necessary.
Support for non-standard Baud rates MIDI, DMX512.
Different colouring for transmitted and received data blue transmitted,
green received.
Data can be forwarded between two RS232 ports.
Search dialog for transmitted/received text right-click pop-up menu.
Save or print the contents of the transmitted/received
text right-click pop-up menu.
Downloads license
Termite 3.2 is copyrighted software that is free for personal and commercial use.
You may use it and distribute it without limitations. You may however not remove
or conceal the copyright. There are no guarantees or warranties whatsoever; use
it at your own risk.
The example plug-in filters are distributed under the
zlib/libpng open
source license.
Termite version 3.2 - complete setup 259 KiB
A self-extracting setup that contains Termite and all plug-ins and
documentation but excluding the source code for these plug-ins. This setup
is provided to conveniently and quickly install Termite. Note that Termite
does not require installation, but it may just be convenient
to do so.
Termite version 3.2 program only 66 KiB
Termite RS232 terminal in a ZIP archive. Just unzip and run; Termite writes
nothing in the registry, no installation or uninstallation is required.
GNU Unifont as a TrueType file 3.2 MiB
The GNU Unifont
allows showing control characters as characters, rather than as
hexadecimal digits between brackets. No installation
of this font is needed; just unzip the font into the same directory as where
Termite resides.
Time stamp filter, including source code 34 KiB
A filter that adds a time-stamp to received data. For those who want to
write their custom plug-in filter s, the commented source code that this ZIP
file also contains may serve as a starting point.
Hexadecimal View filter, including source code 30 KiB
A filter that shows the received data as a hex dump instead of as plain
text, and that also allows you to send non-ASCII bytes by typing hexadecimal
values on the transmit line. This ZIP file contains a compiled filter as
well as commented source.
Highlight filter, including source code 40 KiB
A filter that shows any received text that matches one of several patterns
in a different user-selectable colour. The patterns are regular expressions.
This ZIP file contains a compiled filter as well as commented source. It uses
the SLRE library
for matching regular expressions. The source code for the
SLRE library is
not included in the above ZIP file, and must be downloaded
separately.
Status LEDs filter, including source code 25 KiB
This plug-in filter shows the status of the auxiliary modem and handshaking
lines CTS, DSR, RI and CD and it allows you to toggle the RTS and DTR lines.
The ZIP file contains a compiled filter as well as commented source code.
Log file filter, including source code 33 KiB
This plug-in filter writes all data that it receives to a log file new data
is appended to existing data. The ZIP file contains a compiled filter as
well as commented source code and project files for Microsoft Visual Studio.
Function Key macros filter, including source code 27 KiB
This plug-in filter transmits a user-defined string of text on the press of
a function key keys F1 to F12 are currently supported. The ZIP file contains
a compiled filter as well as commented source code.
Automatic Reply filter, including source code 39 KiB
This plug-in filter checks the incoming text or data for keywords or patterns.
When it detects such a pattern, it automatically transmits a user-defined
reply. The pattern used for matching is regular expression. A series
of such match/reply rows can be used to handle a simple handshake protocol.
This filter uses the SLRE library
Writing plug-in filters for Termite 72 KiB
Programmer s documentation Adobe Acrobat format.
Translating Termite 92 KiB
A guide to add a translation of the user interface of Termite Adobe Acrobat
format.
Recent changes version 3.2
User-interface translations: Spanish and Russian. Thanks go to the
translators Luciano Zini and Viacheslav Vasiliev.
The Italian translation was done by Giuseppe Bordoni, the French translation
by Jean-Michel Terrade, German by Ulrich Schnier and Polish by Krzysztof Kozłowski.
The polling interval, at which Termite checks whether new data has been received,
is now configurable.
A new plug-in filter that automatically sends a reply when received data
matches a search string. Corrections and extensions in other filters.
Usage
Termite focuses on text data, and specifically text that is sent and received
as strings terminated with new-line characters. It has no provisions for
transferring files or binary data. That said, with the hexadecimal view plug-in,
you can send and receive bytes as hexadecimal values, and you may write a
plug-in filter for file transfer as well.
The user interface of Termite, here pictured with the Status LEDs plug-in active
The interface of the Termite program has one large initially empty text area,
which is called the reception view. Above it is a set of buttons in a button
bar and below it is a transmit line into which you can type a line of text.
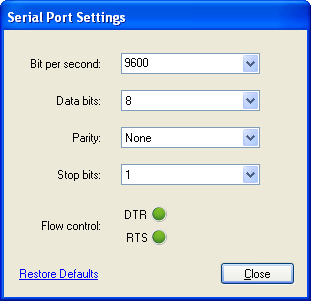
The utility automatically opens the RS232 port for which it was set up. It shows
the current configuration at the left in the button bar. If these are not correct,
you can use the button Settings to choose a different port or
configuration. The Settings dialog also allows you to enable/disable
local echo and/or to append a line termination to every string that you send.
Received bytes with values below ASCII 32 the space character are displayed as
either a control character like, or as two
hex characters between square brackets. So 08 stands for the
backspace character and 1B is the Escape key. There is an
exception for the tab, carriage return and line feed characters
ASCII 9, 13 and 10 respectively ; these cause spacing tab or a
line break.
Whether you see the control character
or 08 for the backspace
key, depends on whether the Unifont font is present and configured in the settings.
If you wish to send a non-ANSI/ASCII character, you need the
hexadecimal view plug-in filter, see Downloads above.
After connecting a serial cable between the PC and the remote device or remote
PC, in which case you must use a null-modem cable and configuring the port, you
can send data by typing text in the transmit line and pressing the Enter key.
Any data that the remote device sends, will appear in the reception view.
Optionally, the text that you transmit is copied to the reception view the
option is called local echo, you will find in in the dialog under the
Settings button. To distinguish the received data from the echoed data,
the echoed text is coloured blue, whereas the received data is green.
The remaining functionality is straightforward: the Clear button clears
the reception view, the About button gives copyright information and the
Close button terminates the utility.
One hidden feature is the ability to disconnect the RS232 port, without terminating
the utility. You can close an RS232 connection with a click in the status field
in the upper left corner of the window left of the button bar. Another
click on that line re-opens the connection with the current settings.
You can use this to free the port temporarily for another application.
Click here to disconnect, or re-connect
Edit history
To speed up entering repetitive commands, Termite keeps a history of recently
sent commands. This history is in a circular queue with the most recent command
at the top.
To browse through the history, use the arrow up and arrow down keys. If you
type in a few characters in the transmit edit line, Termite will use the history
to auto-complete the entry. Pressing the arrow up and arrow down keys then browse
through the entries that match in the first letters. For example, if you have
sent the words test, top, view and set previously, and you type the
letter t on the edit line, Termite will first auto-complete this to either
test or top depending on which word you sent last and the arrow keys will
toggle between test and top. If you clear the edit line and then use the arrow
keys, Termite will loop through the entire history of test, top, view and
set.
Auto-completion and history matching are case sensitive, by the way.
Auto-completion is enabled by default, but can be disabled through the
Settings dialog.
Scrolling
By default, Termite scrolls its reception window so that the most recently
received text is displayed. In case you want to look back at text that has
scrolled out of the reception view, just scroll the text back into view. Termite
will stop to scroll to the end every time it receives new data.
To make Termite restart with its automatic scrolling to newly received data,
scroll the reception view manually to the end of the data.
In other words, Termite only scrolls up text to show newly received data if it
is already at the end of the current data.
Printing, searching text, clipboard support
Some additional functions are available from a pop-up menu that appears when you
right-click in the reception view.
The Copy command copies only the selected text to the clipboard if a selection
exists, and copies all text in absense of a selection. Likewise, the Save command
saves only the selected text to a file if a selection exists and all text if
no selection exists.
Configuration
Termite stores the configuration in an INI file see the next section for the
location of the INI file. This way, Termite remembers its settings between
sessions.
When distributing Termite, you may wish to include an INI file with pre-sets.
You can run Termite directly off a CD-ROM, but the utility will not be able
to store its configuration in the INI file if the INI file resides on a
read-only medium. A typical INI file is below.
Settings
Port 1
Baud 57600
DataBits 8
StopBits 1
Parity 0
Handshake 0
Options
LocalEcho 1
AppendLine 2
Topmost 0
Monospaced 0
Most of these settings can be chosen from the Settings dialog. This means
that to get an appropriate INI file, you can launch Termite, adjust the settings
including activating any plug-in filters that you wish to use,
and voilà: you have your pre-configured INI file.
A few more configurations can be done by editing the INI file directly using a
text editor like Notepad. These are the keywords Caption,
TxColour and RxColour in the Options
topic. The Caption item allows you to change the title
bar of the main Termite window. Add the item Caption below topic
Options and set it to the string that you wish to have displayed
for example, the model name of the product for which you are distributing a
pre-configured Termite. The items TxColour and RxColour
allow you to change the colours for transmitted and received text from the default
blue and green respectively. The syntax for the colours must be rrggbb,
where rr, gg and bb are two hexadecimal
digits. So for example, FF0000 is bright red and 808000
is dark yellow.
INI file location
Termite accesses the INI file from one of two directories, depending on the
start-up situation.
Termite first tries to locate a file called Termite.ini in the application
directory i.e. the directory that the Termite . EXE file resides in. If it
can open or create Termite.ini in the application directory for read/write
access, it uses that file.
If either the application directory does not permit read/write access e.g.
Termite is launched directly from a read-only medium, or the Termite.ini file
is marked read-only, Termite creates a directory under the Application Data
folder of the current user s Local Settings. This new directory is called
Termite, and the INI file is stored there.
The first time Termite uses the sub-folder below the current user s Local Settings,
it also copies the Termite.ini file from Termite s application directory if
it exists. This allows one to store pre-configured INI file on a CD-ROM disk
and still allow the user to change the configuration.
RS232 port scan
Most RS232 settings for a device can be chosen by the developer the Baud rate and
the number of data and stop bits are usually determined by the other device. One
setting that the developer cannot foresee, however, is what COM port the
user will attach it to. For this reason, Termite contains a port lookup function
plus a simple port scanning protocol.
The port lookup function only works with virtual COM ports, such as USB-to-serial
cables. Since Microsoft Windows has drivers pre-installed for USB devices simulating
a serial port, it is a popular design. To use the port lookup function,
put the complete device name of the virtual COM port at the Port
setting. You can find the device names in the registry below the path
HKEY_LOCAL_MACHINE HARDWARE DEVICEMAP SERIALCOMM.
For example, for a common Prolific USB-to-serial cable, the setting in the INI
file might read:
Port Device ProlificSerial2
If using the device name of a serial port is not an option, for example, because
your hardware has a real serial port instead of a virtual one, you can
alternatively use the port scanning protocol. To activate this protocol, set
Port 0 below the Settings section. Port scanning
chooses the first port for which the two following conditions hold:
the port is not already open in use ;
after setting the DTR line, the remote device pulls
DSR up.
Port scanning cannot be selected from the Settings dialog, you
have to edit the INI file to activate it.
The tests for port scanning are primitive. They do not check what device or program
is hooked at the other end. The only thing that you know after a port scan is that
something is connected to the port and that no other program is currently
using that particular port.
In the old days, it had become common practice to connect the DTR
and DSR pins in the connectors of the cable sometimes even at
both ends. This is bad practice, because with such cables you cannot even
diagnose cable connection problems. Yet, such cables still exist, and the port
scan may be fooled by it.
The DRT/DSR handshake usually works with USB-to-RS232 converter cables too.
Non-standard Baud rates
The MIDI protocol is essentially the RS232 protocol over a current-loop physical
layer and with a Baud rate of 31250 bps for details, see the article
A MIDI to RS232 adapter.
Likewise, DMX512 is essentially the RS232 protocol over an RS485 physical layer
and with a Baud rate of 250,000 bps.
Termite presents you with a list of standard Baud rates, but it allows you to
enter different values. The key issue is that the RS232 hardware must support
the Baud rate that you select. All RS232 hardware and all USB-to-RS232 converter
plugs support the standard Baud rates, but only few support non-standard Baud
rates. We have tested non-standard Baud rates successfully with USB-to-RS232
converters based on the FT232R chips from FTDI.
Forwarding data between two RS232 virtual ports
You can use Termite to put a PC or laptop between two systems and monitor their
RS232 communication. The PC or laptop that Termite runs on must have two RS232
ports. Instead of connecting both systems together, you connect both with the
PC that runs Termite. Then, you have to choose one port as the primary port and
the other as the forward port, see the Settings
dialog of Termite.
With forwarding set up, all data received on the primary port is transmitted
through the forward port. All data received on the forward port is transmitted
through the primary port. The sent/received colouring of Termite is also still
in effect: data received on the primary port is in green and data received on the
secondary port is in blue.
In this configuration, Termite would typically only be used to monitor the
communication between two devices. If you type in text on the edit line and
transmit it, this text is only sent through the primary port.
In the above diagram, Termite runs on a computer that sits between two other
systems/devices. If one of these systems is also a computer running Microsoft
Windows, the set-up may be simplified by running Termite on that system. The
dual RS232 port needed for Termite may be replaced by a virtual COM port pair,
such as the com0com
null-modem emulator.
A virtual null-modem creates two ports that exist only in software. Any data
presented to one port of this pair is retransmitted at the other port the same
as how port forwarding works in Termite. If you connect an application to one
port of the pair and Termite to the other port, the application now talks to
Termite. When Termite is then configured to forward transmitted/received data
to a physical port to which the other system is connected, the two systems
communicate as before and Termite intercepts all data.
Filters plug-ins
Plug-in filters allow you to extend Termite in several ways:
Append or insert text or data to what is received for example, the timestamp
sample filter inserts the relative time of reception to every packet of data
that Termite receives.
Remove received data from Termite s queue before Termite processes it, for
example to automatically dump it to a file or to process it separately.
Create windows with different views of the received data. In combination with
the ability to remove data from Termite s queue, this allows you to filter
out different kinds of data from a complex stream, and display each kind in
its own way.
Handle function keys for short-cuts or user-defined macros.
On start-up, Termite collects all plug-in filters that are in the same directory
as the Termite application itself. You can enable and disable a filter in the
Settings dialog of Termite see above. Installing a filter is therefore
a mere matter of copying the file to the correct location and enabling it.
Optionally, filters may have their own configuration options. Termite launches
the filter s configuration dialog when the filter is enabled. To access the
configuration dialog of a filter that is already enabled, double-click on the
filter name you must double-click on the name, not on the check box.
Typically, a filter stores its configuration in the same INI file as the one
Termite uses Termite passes the path to this INI file to the filter when it
loads the filter.
Technically, a filter is a DLL with a few special functions of which only one
is mandatory. The filename extension must be . flt instead of . dll for a
filter. In the Settings dialog, Termite uses the filename minus the . flt
extension for the filter name. See the short document
Writing plug-in filters for Termite
for details on writing filters. To get you started, the sample filters Timestamp,
Hexadecimal View and Status LEDs come with full commented C source code.
Translating Termite
If you wish to translate Termite or correct translations, first get the
document How to translate
Termite. The process is simple, and requires only a simple text editor.
If you wish, you can send the translated files to us we will gladly accept them.
Note that by sending us your translations, you license us to include them in
future versions of Termite.
Rationale and alternatives
I made Termite because I needed a utility for monitoring RS232 data coming from
the hardware devices that we develop. We do that in-house, but devices regularly
need to be monitored after installation at a customers site by our customers.
Therefore, my design requirements were for the utility to be easy to set up, to
run out of the box with preconfigured settings, and to run directly from a
CD-ROM or USB stick without requiring installation.
Over time, I added features that were needed for specific communication requirements
that we stumbled upon, such as non-standard Baud rates, port forwarding, time-stamping
received data and sending/receiving hexadecimal values. The last two items were
later removed from the utility itself, for the sake of keeping the basic utility
simple, and added back as plug-in filters.
In case Termite is not what you are looking for, some alternatives are:
The HyperTerminal applet that comes with Microsoft Windows, or the third-party
HyperTerminal Private Edition.
MCS Electronics provides the free
simpleterm utility amongst its downloads. Choose Downloads, then BASCOM.
Then select the MCS Simple Terminal from the list.
YAT, a freeware serial terminal
by Dieter Fauth is listed on the site of Lakeview
Research.
Termie,
which started as an open-source clone of Termite, but now has some features that
Termite lacks, while lacking some of Termite s features.
Terminal by Br y, a free terminal that supports text and hexadecimal
display, macros, scripting, graphic visualization and more.
Termite was rated as good by NONAGS.
Perle IOLAN Terminal Servers connect RS232/RS422/RS485 devices over Ethernet to Windows and Linux serial apps. A great Cisco Terminal Server alternative.
Moxa s terminal server are equipped with the many specialized functions and security features mandatory when establishing terminal connections to a network.
Award-winning RS232 RS485 RS422 TTL Serial Port Monitor Terminal Analyzer Software, Win 8/7/Vista/XP supported.
Terminal Emulator and Thin Client Software

Eltima is a global software development company, that specializes primarily in serial communication, security and flash software. Among our products are USB Network.
Realterm is a terminal program specially designed for capturing, controlling and debugging binary and other difficult data streams. It is far better for debugging.
Terminal Emulator and Thin Client Solutions. Terminal Emulation available for a thirty day trial. PIXL Thin Client and PIXIL Server solve Thin Client needs.